XT30 Male Female Bullet Connectors Plugs for RC Lipo Battery Drone Quadcopter (TA0506) Products

| Name | XT30 Male Female Bullet Connectors Plugs for RC Lipo Battery Drone Quadcopter |
| Code | TA0506 |
| Price | Rs.100.00 |
| In Stock | Yes |
Product Details
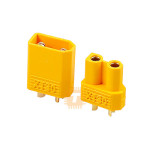
XT30 connectors are industry-standard, ultra-compact, high-reliability nylon bullet connectors engineered for low-weight, high-current electrical applications. Specifically scaled down from the larger XT60 framework, these connectors are the gold standard for powering miniature radio-controlled (R/C) aircraft, micro drones, FPV quadcopters (typically 2-inch to 3-inch builds), and small robotics platforms running on 2S to 4S LiPo battery packs.
Specification
- Model Suffix: XT30U / XT30 (Amass Genuine Standard)
- Metal Conductor Core: 2mm Gold-Plated Brass Bullet Pins
- Housing Material: High-Temperature, Impact-Resistant Nylon (Polyamide)
- Continuous Current Rating: 15A
- Instantaneous Peak Current: 30A (Short duration burst cycles < 30>
- Recommended Wire Gauge: 16 AWG to 20 AWG silicone-insulated flexible wire
- Maximum Working Voltage: 500V DC
- Contact Resistance: Ultra-low Approx 0.70mΩ
- Flammability Rating: UL94 V0 (Self-extinguishing nylon composite)
- Temperature Operational Threshold: -20℃ to 120℃
Features
- Asymmetric Anti-Reverse Design: The external nylon body is shaped with one flat side and one pointed/triangular side. This asymmetrical physical housing makes it mathematically impossible to plug the connector in backward, completely eliminating the risk of reverse polarity short-circuits.
- Low-Resistance Solid Bullet Pins: Features solid gold-plated brass plugs that ensure tight surface contact across the entire plug sleeve, minimizing electrical resistance and preventing efficiency loss or heat buildup at high currents.
- Solder-Shield End Caps (Cups): The rear welding terminals are shaped like hollow cups. This encapsulates the bare wire ends and solder joints within a protective recess, reducing the risk of stray wire strands bridging across to the opposite terminal block.
- Ultra-Lightweight Profile: Weighing a mere fraction of an XT60 plug (Approx 0.8g per pair), they minimize the weight of micro-FPV drones where every single gram directly affects flight duration and agility.
Common Applications
- Micro FPV Quadcopters: Serving as the primary power distribution interface for 2.5-inch and 3-inch "Toothpick" style or "Whoop" micro drones.
- Small Capacity LiPo Battery Packs: Factory-installed on 2S, 3S, and 4S lithium-polymer cells ranging from 300mAh to 850mAh.
- RC Park Flyers & Gliders: Powering lightweight foam RC airplanes running small brushless outrunner motors.
- Combat Robotics & STEM Builds: Delivering battery power to micro-weight (Antweight / Beetleweight) combat robots and automated arduino-driven buggies.
Usage, Assembly & Soldering Best Practices
1. Identifying Male vs. Female Assemblies
In the electronics industry, connectors are classified by their internal metal pins, not their outer plastic shells:
- Female Connector: Contains the hollow metal receptacles hidden inside the housing. The battery pack must always use the Female connector to prevent exposed live metal terminals from shorting out if they touch tools or metal frames.
- Male Connector: Features the solid metal pins protruding inside the plastic shroud. This connector is soldered onto the ESC (Electronic Speed Controller), drone frame, or load side.
2. The Golden Rule of Soldering: "Plug Them In First"
When soldering wires onto an unmounted XT30 connector, the intense heat from your soldering iron can quickly transfer down the brass pins, softening the surrounding nylon housing. If the nylon softens, the metal pins can drift out of alignment, ruining the connector permanently.
- Solution: Always plug a spare, sacrificial opposite mate into the connector you are soldering. The mating connector acts as a rigid alignment jig, holding the pins perfectly centered even if the internal plastic gets hot.
3. Step-by-Step Soldering and Insulation Sequence
- Slide a pre-cut piece of heat-shrink tubing (2.5mm or 3mm diameter) onto your wire before stripping the insulation.
- Clamp the connector safely into a small workbench vice or a "helping hand" tool.
- Pre-tin both the hollow cups of the connector and the bare strands of your silicone wire with high-quality flux-core solder.
- Bring the hot soldering iron tip and the tinned wire end together inside the terminal cup. Heat the joint until the solder flows smoothly into a single solid pool, then remove the iron cleanly while holding the wire dead still for 3 seconds.
- Check the polarity markings stamped on the nylon casing:
+(Positive/Red Wire) is usually next to the flat side, and-(Negative/Black Wire) is next to the curved side. - Once the joint cools completely, slide the heat-shrink tubing down over the soldered joint and apply heat to shrink it, ensuring no bare metal is left exposed to open air.
Sharing is caring, show love and share the product with your friends.
Featured


Add to Cart